

User & Roles
You can collaborate with your team or employees and accountants in Zoho Practice, by inviting them as users, and providing them with role-based access.
User
A user is someone who has access to your Zoho Practice organization. A user is typically your team member or employee who works on tasks for your clients or somoene who manages the day-to-day of your organizations. You can add multiple users to your organization.
Role
A role refers to the level of access and permissions that a user can have in an organization. In Zoho Practice, we have standard roles like Admin who has unrestricted access to all modules. You can however, clone this role, configure permissions and create custom roles as required by your firm. Additionally, there is a Super Admin role that has the highest level of access and control over the organization.
Here’s how you can access or configure roles:
- Go to Settings on the top-right corner of the page.
- Select Roles under Users & Roles.
Note: The default roles in Zoho Practice cannot be edited or deleted. Want to create your own role? Try Custom Roles.
Super Admin
In Zoho Practice, the Super Admin role is automatically assigned to the user who creates the organization. In addition to standard admin permissions, the Super Admin has exclusive privileges to manage other admins in the organization.
Note: An organization can have only one Super Admin, and this Super Admin is shared across all Zoho Finance apps associated with the organization.
For existing organizations that don’t have a Super Admin, you must manually assign one from the users who are active Admins across all Zoho Finance apps in your organization.
Unique Privileges of a Super Admin
The Super Admin has exclusive privileges that are not available to other admins in the organization.
Set Up the Organization in Other Zoho Finance Apps
Only the Super Admin can set up the organization in other Zoho Finance apps. For example, if you’re the Super Admin of an organization in Zoho Practice, you can set up the same organization in other Zoho Finance apps, such as Zoho Books, Zoho Billing, Zoho Expense, Zoho Invoice, and Zoho Inventory.
If another admin wants to set up the organization in another Zoho Finance app, they must send a request to the Super Admin for approval.
- The Super Admin receives an email with a link to the request.
- The link opens a list of admins who have requested access.
- The Super Admin can Accept or Reject each request.
Once the request is approved, the admin can join the organization in the respective Zoho Finance app and retain their Admin role.
Delete the Organization
Only the Super Admin can delete the organization.
Make Another Admin the Super Admin
If you’re already a Super Admin and want to make another admin as the Super Admin, you can do so at any time. Once done, the new Super Admin will gain the Super Admin privileges across all Zoho Finance applications of that organization.
Scenario: Aaron is the Super Admin of his Zoho Practice organization. As he plans to leave the organization, he decides to make Patricia, an active admin, the new Super Admin in the organization. With this, Aaron ensures that the organization continues to operate smoothly even after he leaves.
To make another admin as the Super Admin of your organization:
- Log in to your Zoho Practice organization.
- Go to Settings in the top right corner.
- Under Organization Settings, navigate to Users & Roles and select Users.
- Select the admin you want to assign as the new Super Admin.
- In the pane that appears, click the More icon in the top right corner, and select Make Super Admin in the dropdown.
- In the confirmation pop-up, click Make Super Admin.
The selected admin will become the Super Admin for your organization.
Super Admin for Client Organizations
When a Zoho Practice user creates a client organization on behalf of a client, the client user is assigned the Super Admin role and not the Zoho Practice user who created the organization. This ensures the client retains complete ownership and control over their organization, while the accountant continues to work within it as an admin.
Invite Users
When you create a Zoho Practice organization, your role is defined as the Admin by default. Once you are an admin, you can add multiple users with different roles to your organization. Here’s how:
- Go to Settings on the top-right corner of the page.
- Select Users under Users & Roles.
- Click Invite User on the top-right corner of the page.
- Enter the email address, name and the role of the user you want to invite to your organization.
- Click Save.

Once you invite a user, an email will be sent to the new user to join your organization. Your user can then verify their email address and set up a login password to access your Zoho Practice organization.
Note: Only Admin users can add new users.
Custom Roles
Apart from the predefined role, such as Admin in Zoho Practice, you can add additional roles with different levels of access or permissions. These roles are called Custom Roles.
Here’s how you can add a custom role:
- Go to Settings on the top-right corner of the page.
- Select Roles under Users & Roles.
- Click the New Role button on the top-right corner of the page.
- Select the modules and the level of access you want to provide for the role.
- Click More Permissions for additional access options.
- Click Save once you’ve configured the role.
You can now associate this custom role to your users as required.
Additional Fields for Users
By default, the details about a user in Zoho Practice includes their name and email address. If you want to record other details apart from this, you can create a custom field to record more infomration.
Here’s how you can create a custom field for users:
- Go to Settings on the top-right corner of the page.
- Select User Preferences under Users & Roles.
- Select the Field Customization tab on the top of the page.
- Click the + New Custom Field button in the top-right corner of the page.
- Enter the required details.
- Click Save.
The custom fields that you’ve created will be shown while adding a new user to your organization.
This new field will be saved under the Field Customization tab. You can edit or mark it as inactive by hovering over the field and clicking the drop-down arrow that appears.
Mark Users as Inactive
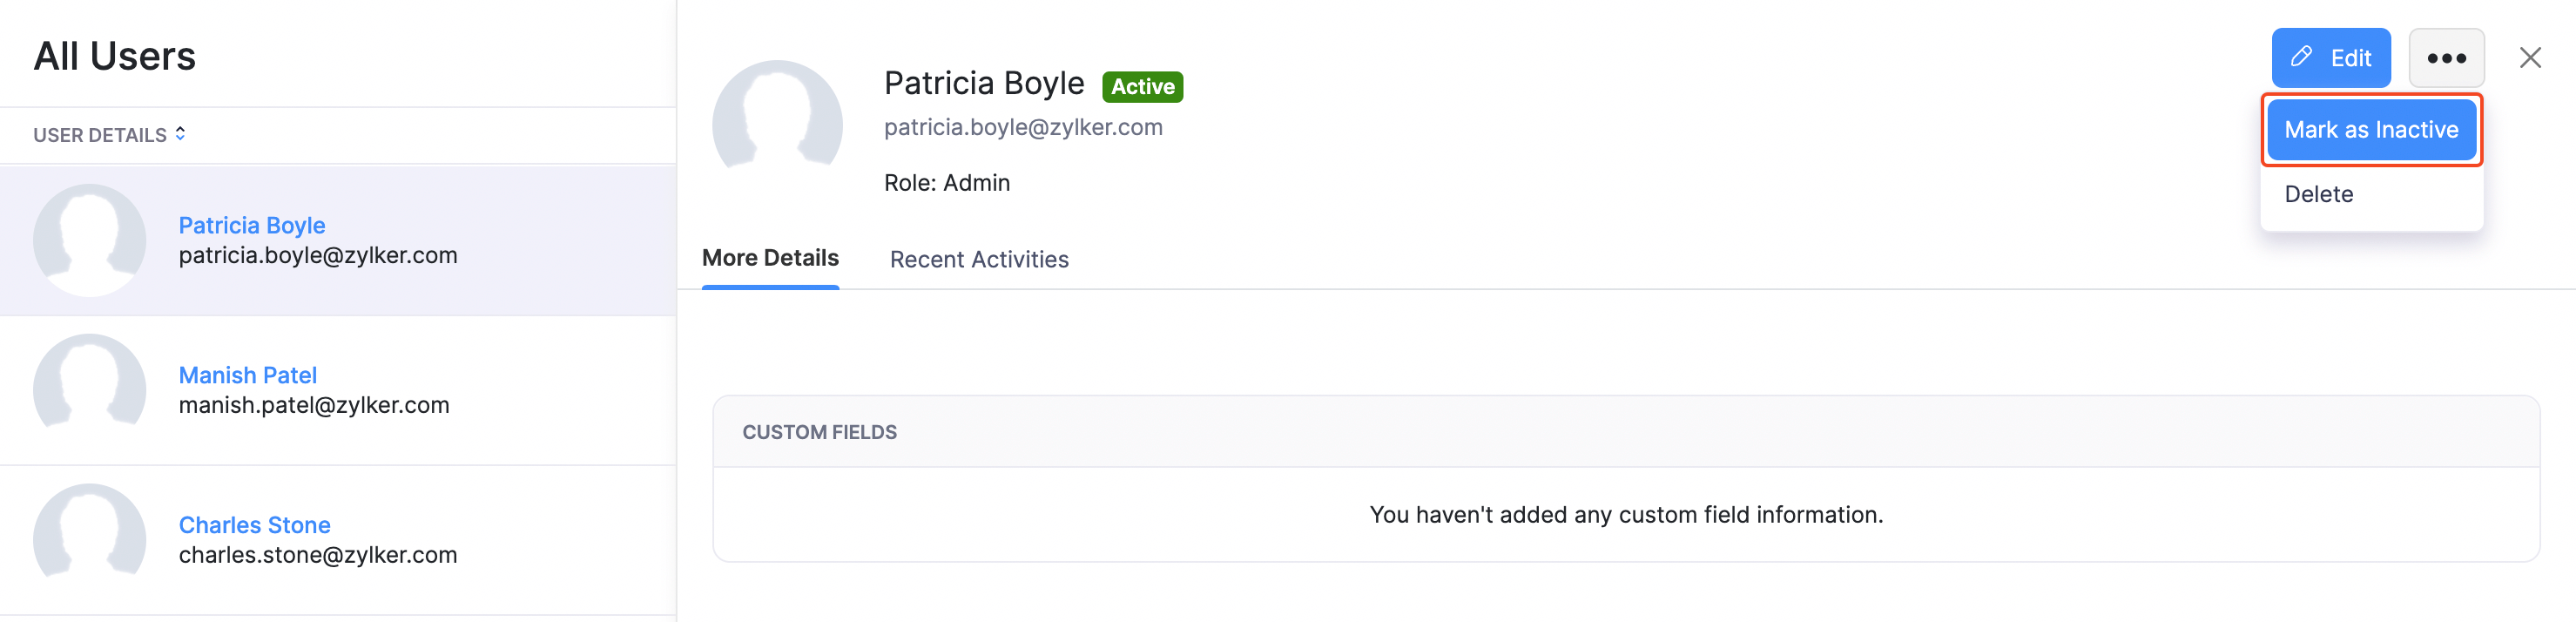
Sometimes, you might want to restrict a user from accessing your organization for a while. In such cases, you can mark users as inactive. You can always make the user as active again.
Here’s how you can mark a user as inactive:
- Go to Settings on the top-right corner of the page.
- Select Users under Users & Roles.
- Select the user you want to mark as inactive.
- Click the More icon.
- Click Mark as Inactive.
Mark User as Active
You can make an inactive user as active again. Here’s how:
- Go to Settings on the top-right corner of the page.
- Select Users under Users & Roles.
- Select the inactive user you want to mark as active.
- Click the More icon.
- Click Mark as Active.
Edit Users
After you have added a new user, you can edit their information if required. Here’s how:
- Go to Settings on the top-right corner of the page.
- Select Users under Users & Roles.
- Click Edit.
- Make the required changes.
- Click Save.
Note: Only Admin users can edit user information.
Delete User
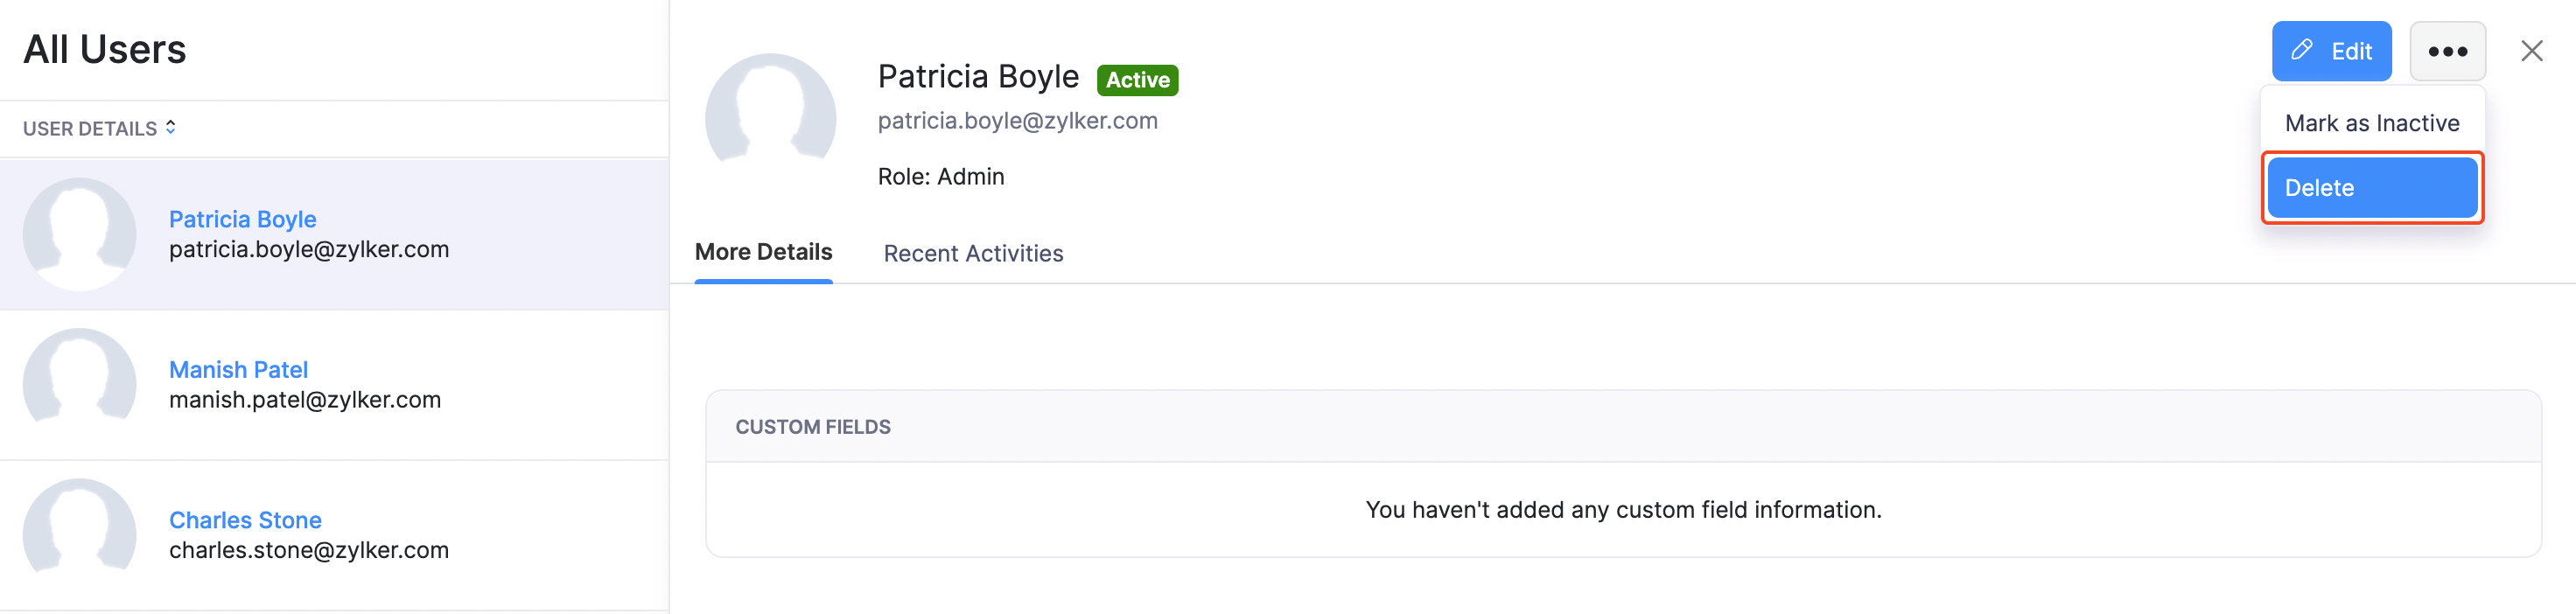
You can delete a user whom you no longer want to give access to your Zoho Practice organization.
Here’s how you can delete a user:
- Go to Settings on the top right corner of the page.
- Select Users under Users & Roles.
- Select the user whom you want to delete.
- Click Delete.
Do you want to restrict access for a user, but don’t want to delete them? Mark the user as inactive.