Manage custom roles
Overview
Zoho Analytics uses a role based model to control what each user can access and do in your organization. The predefined roles cover common needs, but they may not match every job in your team. Custom roles let you define your own roles with only the permissions a job requires, and assign them to the users who need them.
With custom roles, you can:
- Grant fine-grained permissions instead of the broader permission set bundled in a predefined role.
- Give users access to all views of a selected entity in a shared workspace, without sharing each view individually.
- Allow users to create reports and dashboards without granting administrator privileges.
The Account Administrator and Organization Administrators can create and manage custom roles.
What's in this page:
- Access permission types
- Custom roles compared with other roles
- Create a custom role
- Assign a custom role
- Manage custom roles
- Frequently asked questions
Access permission types
The scope of a custom role is set by the option you select in the Access Permissions section when you create the role. Selecting a broader option automatically includes the narrower ones; for example, selecting All Reports And Dashboards also selects All Dashboards.
- All Dashboards: Gives access to all dashboards in the shared workspace. This suits users such as a CEO who views dashboards for analysis but does not work with reports or data.
- All Reports And Dashboards: Gives access to all reports and dashboards in the shared workspace. Users with this permission can also create dashboards and folders. Creating reports requires access to data, so it is available only with the All Data, Reports And Dashboards permission.
- All Data, Reports And Dashboards: Gives access to the data, reports, and dashboards in the shared workspace. Users with this permission can create tables and import data, create query tables, use formula columns and aggregate formulas, and create reports and dashboards.
Custom roles compared with other roles
| Capability | Custom role | Viewer | User | Workspace Administrator |
| Access scope | All views of the selected entity in the shared workspace | Only views explicitly shared to them | Only views explicitly shared to them | All views in the workspace |
| Access to new views | Automatic for the selected entity | No, until shared | No, until shared | Automatic |
| Create or modify reports | Yes, if granted | No | No | Yes |
| Add or modify data | Yes, if granted | No | Yes, in shared tables | Yes |
| Administrative privileges | None unless granted | None | None | All, except renaming, deleting, or backing up the workspace |
Create a custom role
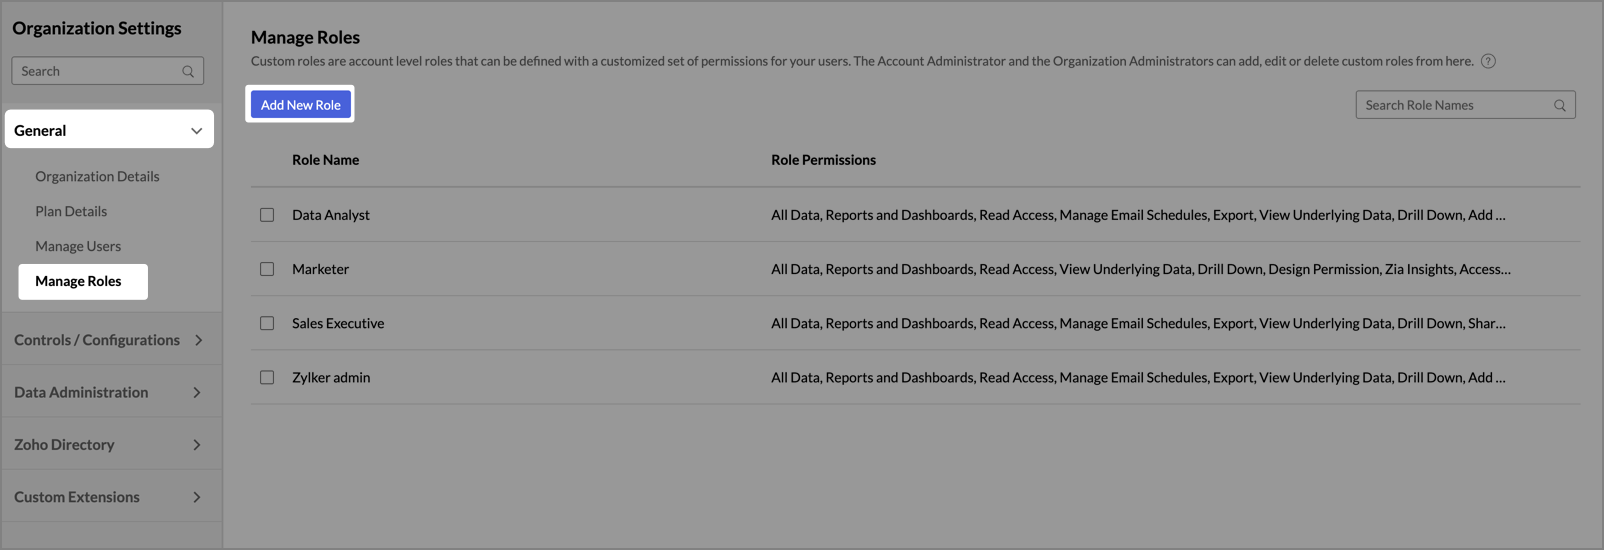
- Click the Organization Settings icon at the top right of your account.
- In the left panel, click Manage Roles under General.
- Click Add New Role. The Create Role dialog opens.
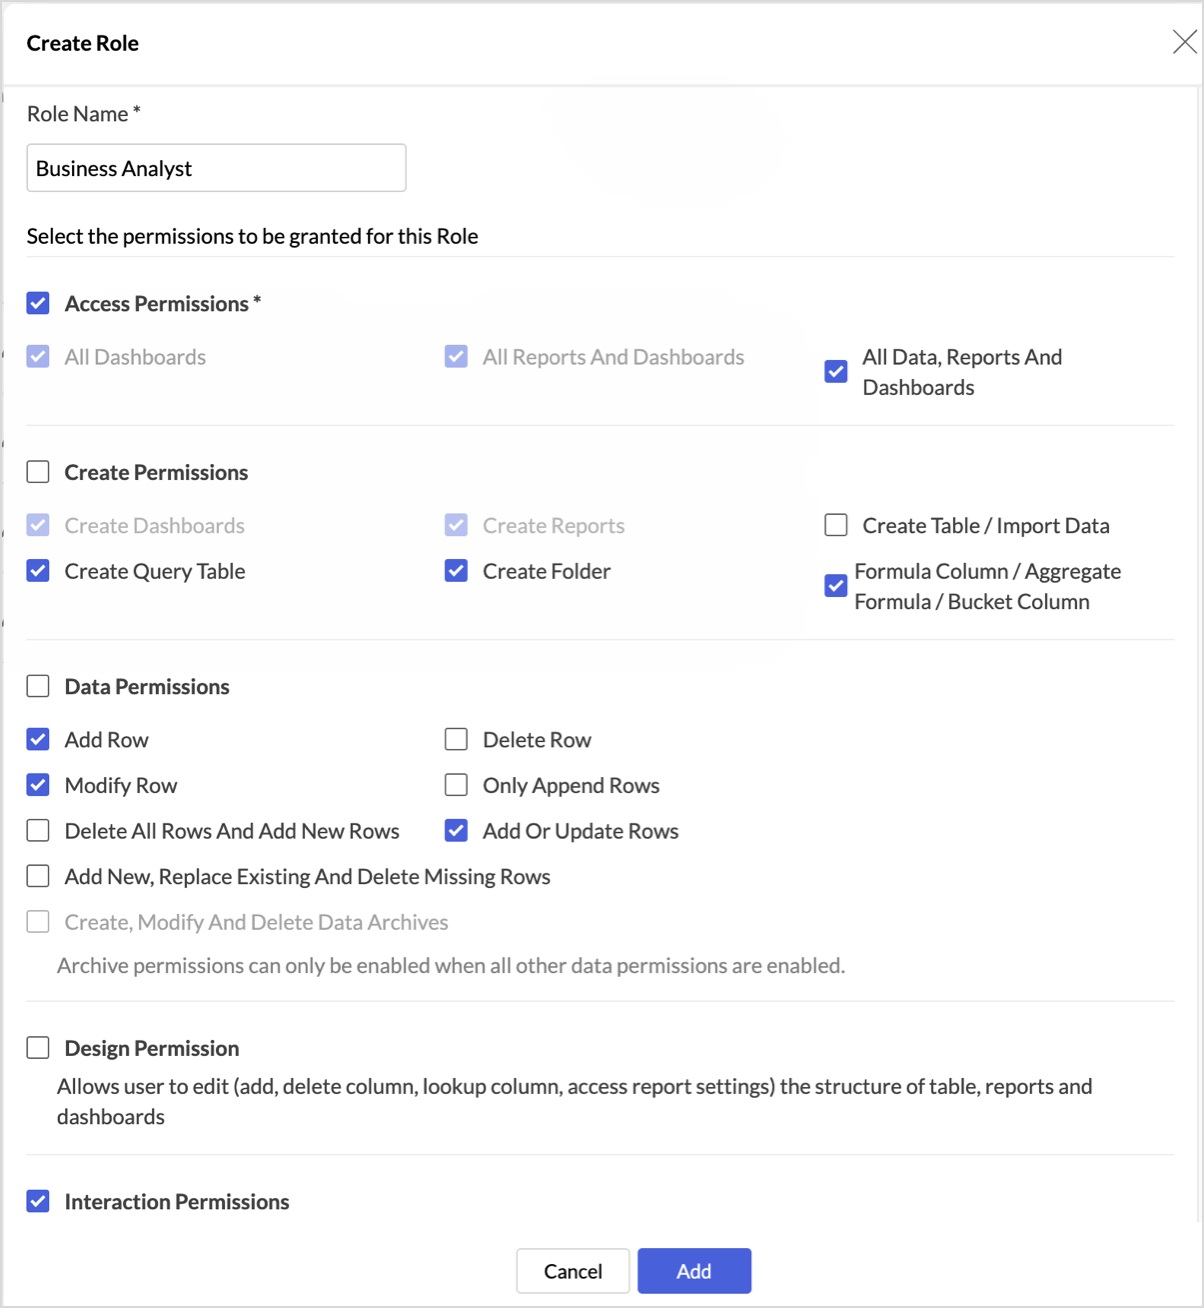
- In the Role Name field, enter a name for the role.
- In the Access Permissions section, select the entities the role can access: All Dashboards, All Reports And Dashboards, or All Data, Reports And Dashboards. The remaining options vary based on this selection. See <<Custom role permissions>> below.
- Select the other permissions the role requires.
- Click Add. The role is created and listed in the Manage Roles page. You can now assign it to your users.
Custom role permissions
The permissions available depend on the option you select in the Access Permissions section.
Create Permissions
| Permission | Description | All Dashboards | All Reports And Dashboards | All Data, Reports And Dashboards |
| Create Dashboards | Users can create dashboards. Selected by default and cannot be cleared. | - | Yes | Yes |
| Create Reports | Users can create and edit reports. Selected by default and cannot be cleared. | - | - | Yes |
| Create Table / Import Data | Users can create tables and import data. | - | - | Yes |
| Create Query Table | Users can create query tables. | - | - | Yes |
| Formula Column / Aggregate Formula / Bucket Column | Users can add formula columns, aggregate formulas, and bucket columns. | - | - | Yes |
| Create Folder | Users can create folders. | Yes | Yes | Yes |
Data Permissions (All Data, Reports And Dashboards only)
| Permission | Description |
| Add Row | Users can add rows in the table. |
| Delete Row | Users can delete rows in the table. |
| Modify Row | Users can modify rows in the table. |
| Only Append Rows | Users can only append rows in the table while importing. |
| Delete All Rows And Add New Rows | Users can delete all rows and append rows in the table while importing. |
| Add Or Update Rows | Users can append and modify rows in the table while importing. |
| Add New, Replace Existing And Delete Missing Rows | Users can add, update, and delete rows in the table while importing. |
| Create, Modify And Delete Data Archives | Users can create, modify, and delete data archives. |
Note: Archive permissions can be enabled only when all other data permissions are enabled.
Design Permission (All Data, Reports And Dashboards only)
Users can edit the structure of tables, reports, and dashboards, including adding and deleting columns, lookup columns, and accessing report settings.
Interaction Permissions
Available for all access permission types.
| Permission | Description |
| Read Access | Grants read access. Selected by default and cannot be cleared. |
| View Underlying Data | Users can view the underlying data of reports. |
| Drill Down | Users can drill down reports. |
| Drill Through | Users can drill through reports. |
| Drill Actions | Users can use drill actions in reports. |
| Zia Insights | Users can use Zia Insights to get narrative analysis. |
| GenAI Skills | Users can use GenAI skills. |
Sharing & Collaboration Permissions
Available for all access permission types.
| Permission | Description |
| Share Views / Child Reports | Users can re-share views and child views. |
| Commenting Actions | Users can comment on shared views. |
| Private Links | Users can generate private links for views. |
| Access Admin/Owner Presets | Users can access presets created by admins and owners. |
| Allow Preset Creation | Users can create presets. |
Publishing Permissions
| Permission | Description | All Dashboards | All Reports And Dashboards | All Data, Reports And Dashboards |
| Export | Users can export and email data. | Yes | Yes | Yes |
| Manage Email Schedules | Users can create and manage email schedules. The Manage Email Schedule created by them link below the option restricts this to schedules they created. | Yes | Yes | Yes |
| Manage Data Alerts | Users can create and manage data alerts. The Manage Alerts created by them link below the option restricts this to alerts they created. | - | Yes | Yes |
| Create Slideshow | Users can create slideshow links for views. | Yes | Yes | Yes |
| Public Views | Users can generate public links for views. | Yes | Yes | Yes |
Data Source Permissions (All Data, Reports And Dashboards only)
These permissions define whether users with the role can access the data sources created by other users, and what they can do with them.
| Permission | Description |
| View Data Source | Users can access the Data Sources page and view the data source connections in a workspace, including the sync history, audit history, and last import details of each table. |
| Use Data Source | Users can import new tables using an existing data source connection. This permission is available only when the Create Table / Import Data permission is enabled. |
| Sync Data | Users can use the Sync Now option, and the Retry Sync option when an import fails. |
| Edit Data Source | Users can re-authenticate or edit the connection details, manage the sync interval and import settings, move tables to a different schedule, and remove tables from the connection. |
| Remove Data Source | Users can remove the data source. |
Note:
- Data source permissions apply to essential connectors and sources only, and only to sources or connections created by other users in a workspace. Users with custom roles are automatically granted full access to the sources they own.
- For business connectors, only Organization Administrators can set up a connection, manage modules and fields, and manage sync settings. Workspace Administrators and users with custom roles cannot manage business connectors.
Assign a custom role
You can assign custom roles to new users, or change the role of existing users, viewers, and Organization Administrators.
Note:
- You can assign a different role to a user for each workspace. Licensing is calculated by the number of users in your organization, not by the number of roles assigned to them.
- The Change role option in the Manage Users page of Organization Settings offers only the User, Viewer, and Organization Admin roles. You cannot assign a custom role from there. Assign custom roles while adding a user, or from the Manage Users section of the Workspace Settings page.
- Changing a user's role revokes some of the privileges of their current role, based on the new role assigned.
Tip: To change the role of multiple users at once, select them in the Manage Users page of Organization Settings and click the Change Role link that appears at the top of the list.
Add a new user with a custom role
- Click the Organization Settings icon at the top right of your account.
- In the left panel, click Manage Users under General.
- Click Add Users. The Add Users dialog opens.
- In the Role field, select the custom role you want to assign.
- In the Select Workspace field, select the workspaces you want to share with the users. Users inherit the defined permissions over all the views in these workspaces.
- In the Enter email addresses field, specify the email addresses of the users you want to add. You can also add users from your contacts by clicking the Pick Users link.
- Click Add. The users are added.
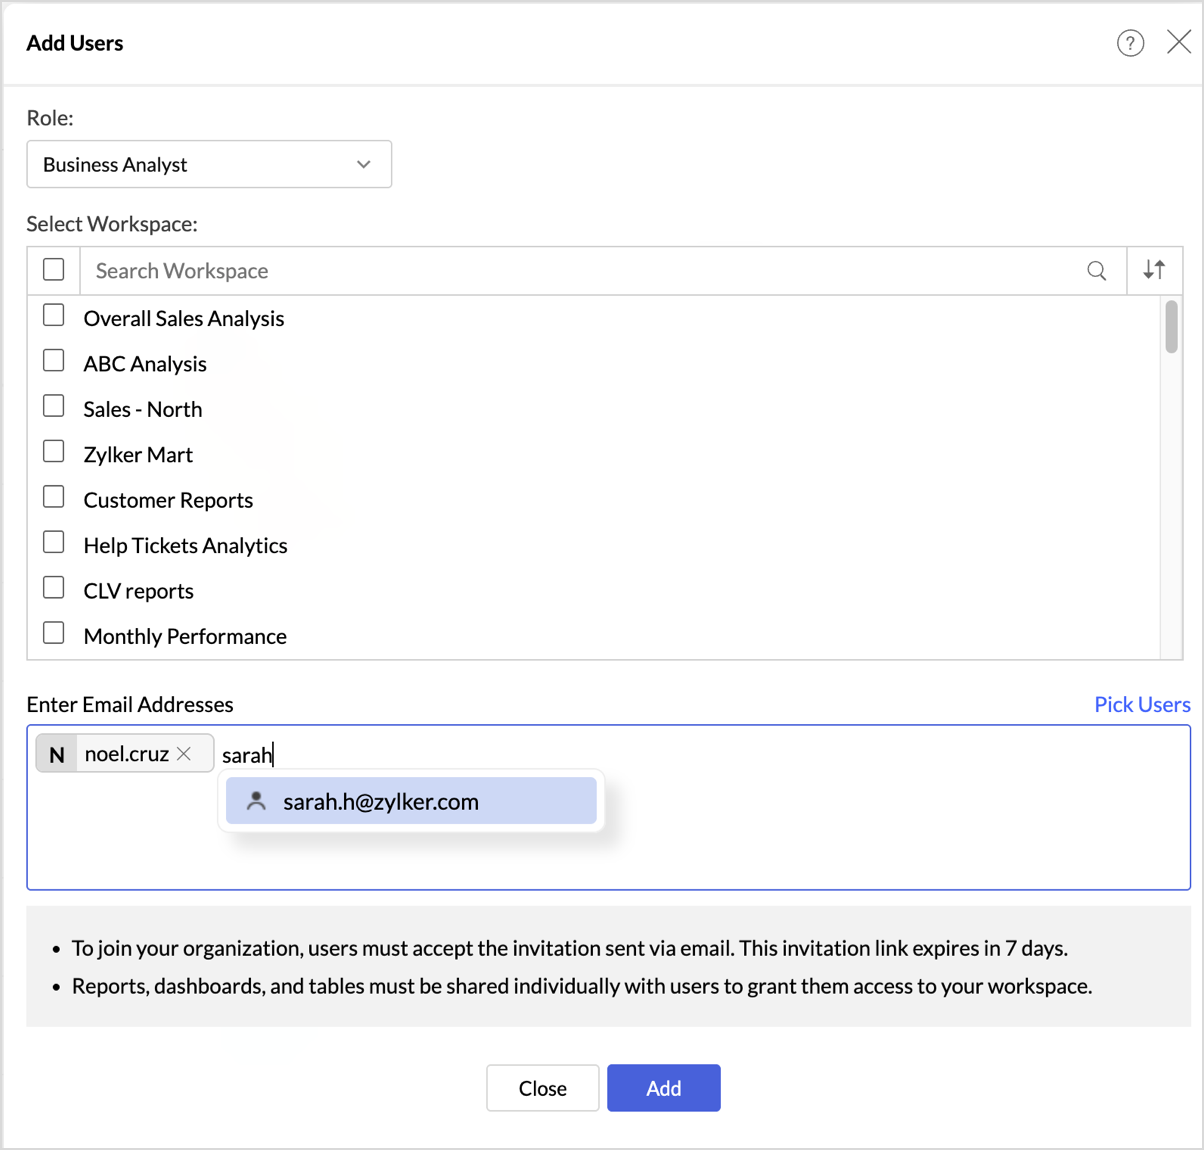
Note: To join your organization, users must accept the invitation sent via email. The invitation link expires in 7 days.
You can also add users with a custom role from a workspace: open the Workspace Settings page, go to the Manage Users section, and click Add Users. The same dialog opens without the Select Workspace field.
Change an existing user to a custom role
Change the user's role for the corresponding workspace from the Workspace Settings page.
- Open the Workspace Settings page of the workspace shared with the user.
- Go to the Manage Users section.
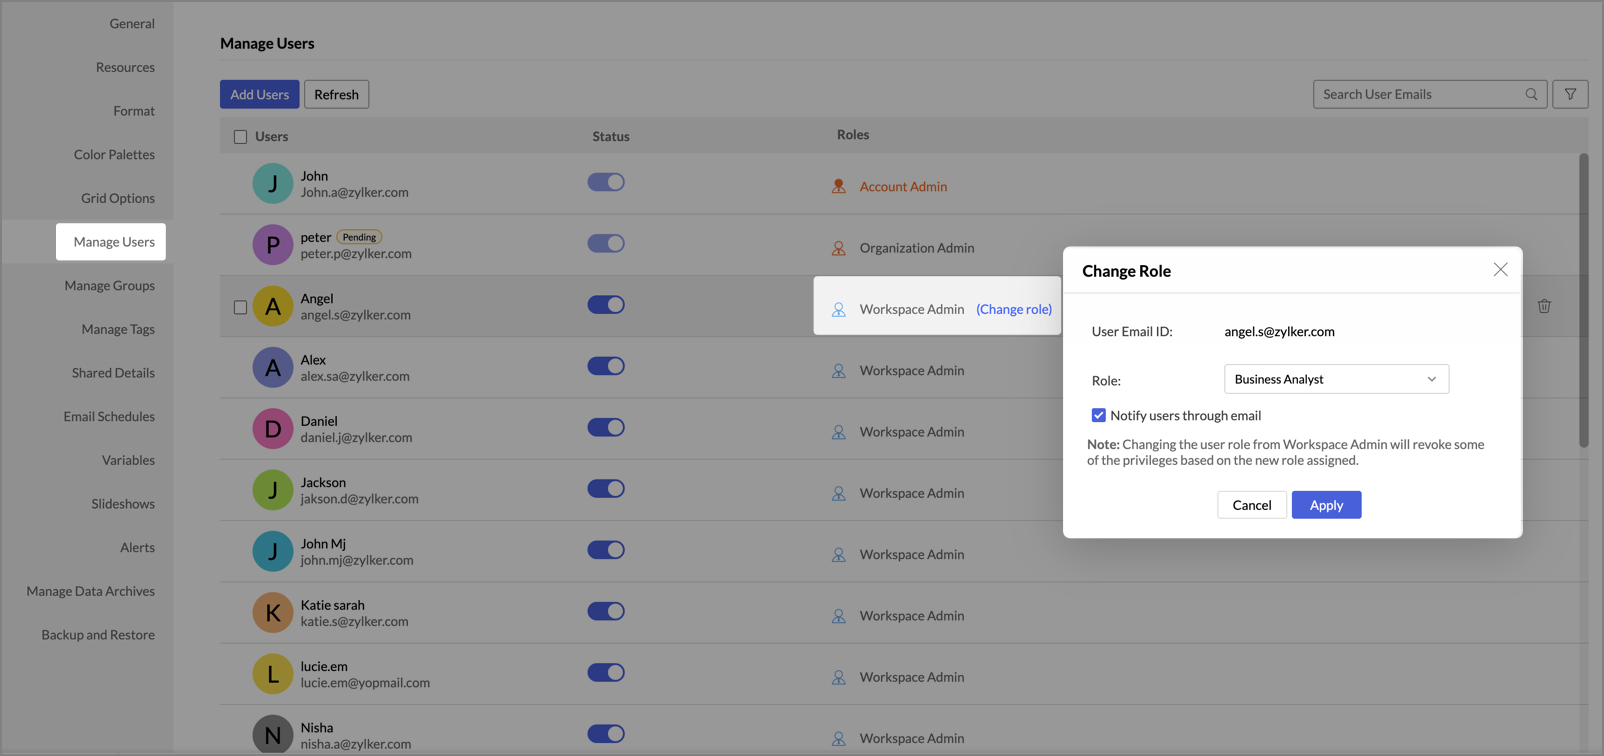
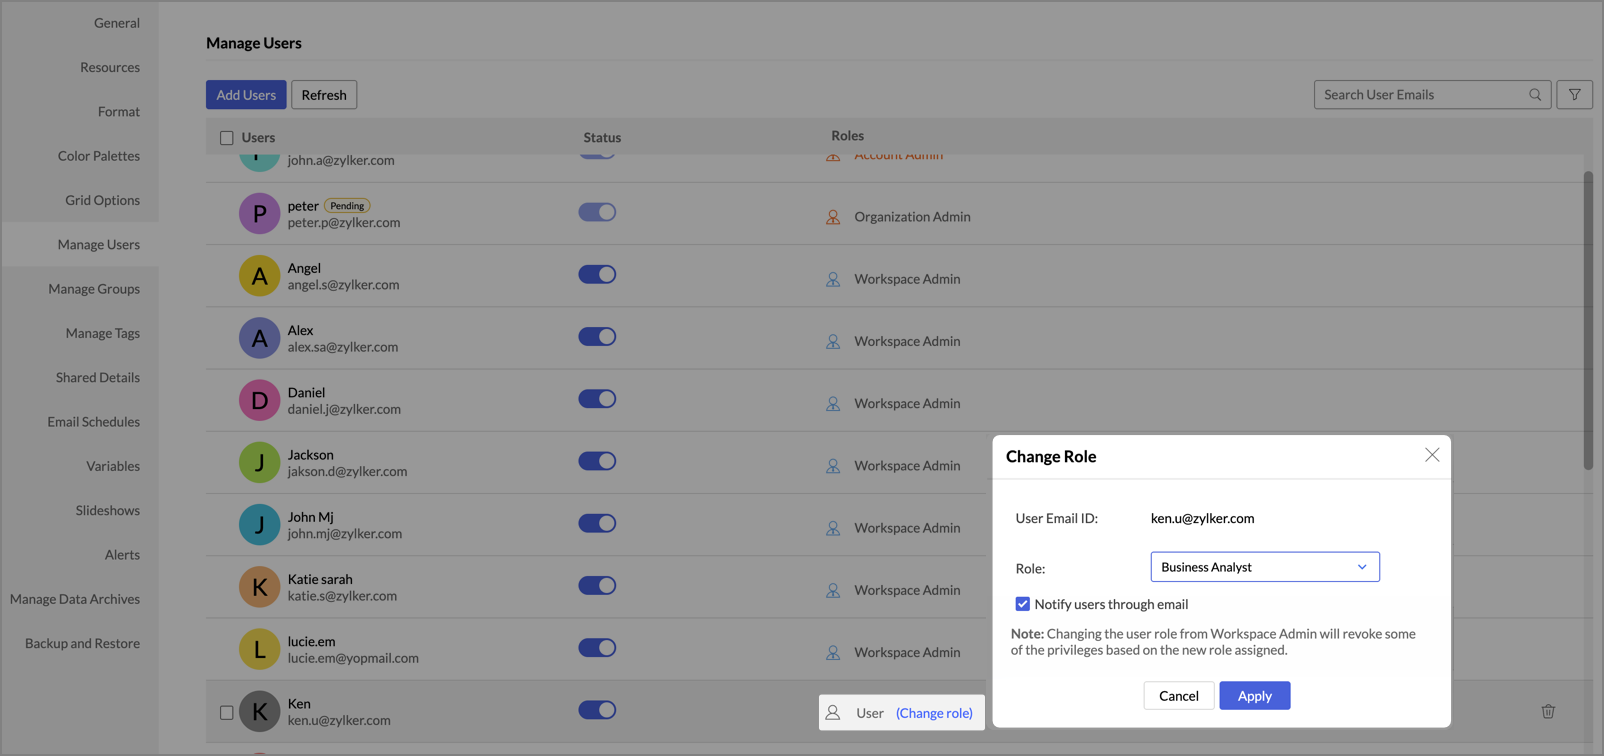
- Hover over the user's role in the Roles column and click the Change role link that appears. The Change Role dialog opens, showing the user's email ID.
- In the Role field, select the custom role.
- Select or clear Notify users through email, and click Apply.
Change a viewer to a custom role
Custom roles cannot be assigned to viewers directly. Change the viewer to a user first, then assign the custom role from the workspace.
- Click the Organization Settings icon at the top right of your account.
- In the left panel, click Manage Users under General.
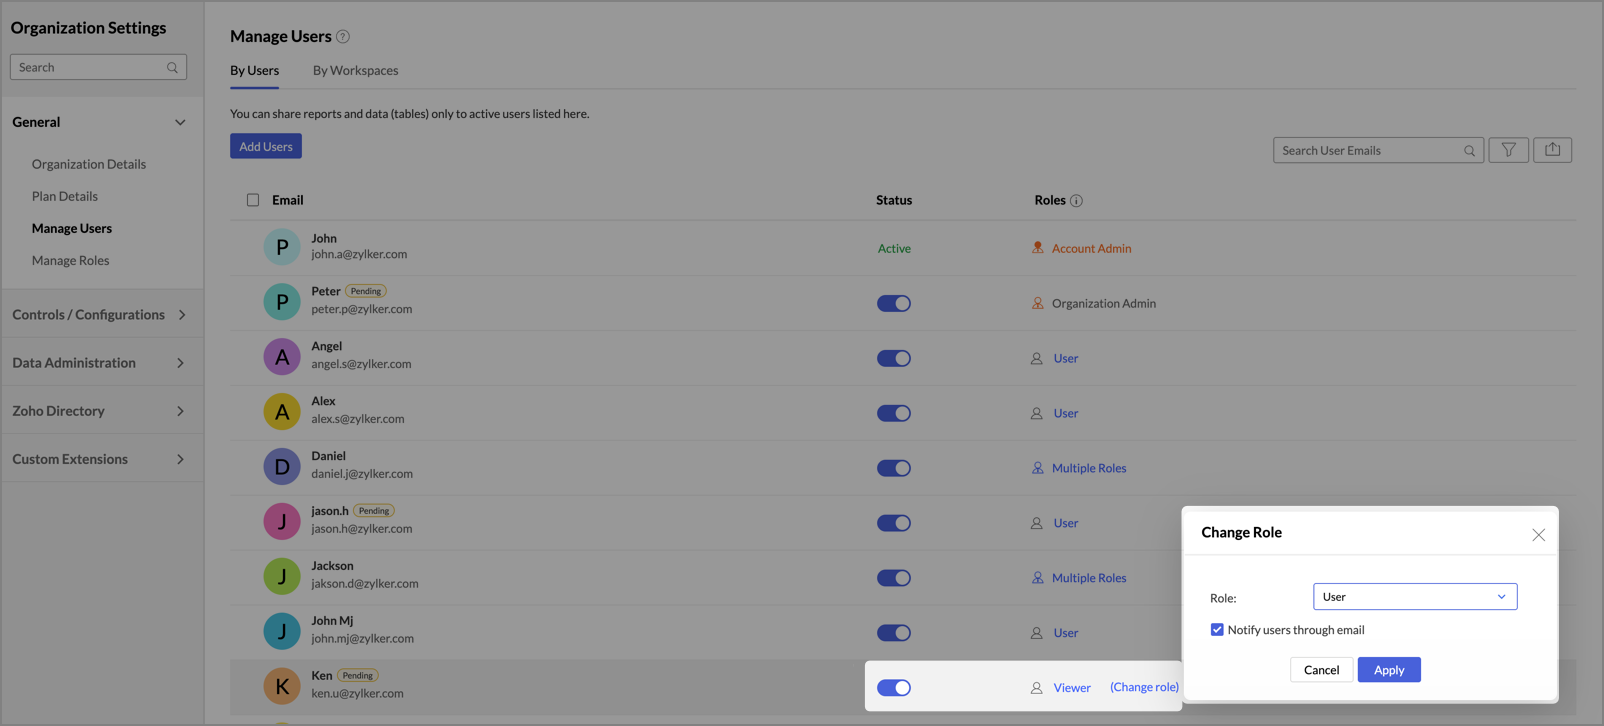
- Hover over the viewer's role in the Roles column and click the Change role link that appears. The Change Role dialog opens.
- In the Role field, select User.
- Select or clear Notify users through email, and click Apply.
- Open the Workspace Settings page of the workspace shared with the user.
- Go to the Manage Users section.
- Hover over the user's role in the Roles column and click the Change role link that appears.
- In the Role field, select the custom role.
- Select or clear Notify users through email, and click Apply.
Change an Organization Administrator to a custom role
Custom roles cannot be assigned to Organization Administrators directly. Change the administrator to a user first, then assign the custom role from the workspace.
Note: Only the Account Administrator can assign or change the Organization Administrator role. Organization Administrators cannot change the role of other Organization Administrators.
- Click the Organization Settings icon at the top right of your account.
- In the left panel, click Manage Users under General.
- Hover over the administrator's role in the Roles column and click the Change role link that appears. The Change Role dialog opens.
- In the Role field, select User.
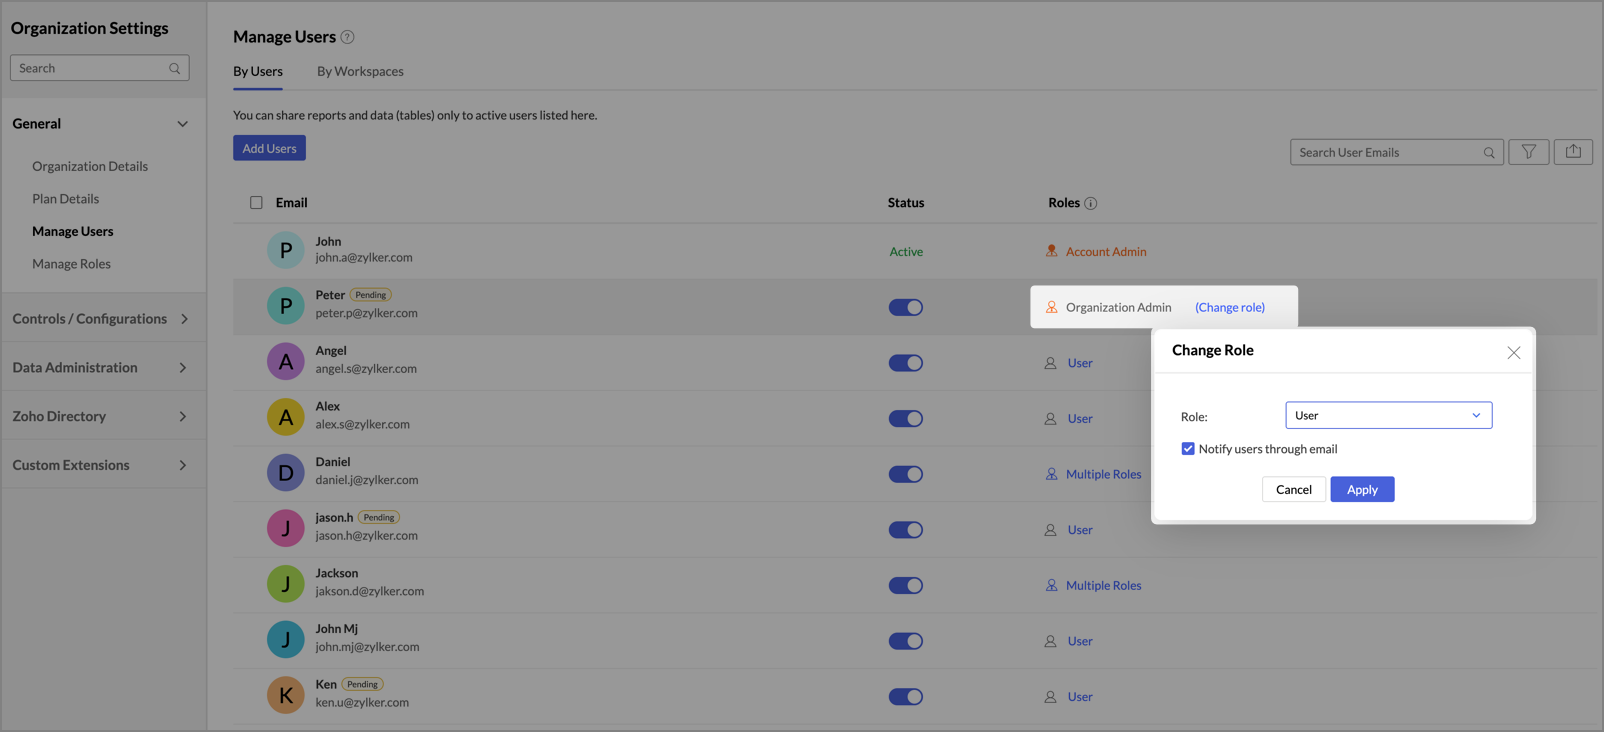
- Select or clear Notify users through email, and click Apply.
- Open the Workspace Settings page of the workspace shared with the user.
- Go to the Manage Users section.
- Hover over the user's role in the Roles column and click the Change role link that appears.
- In the Role field, select the custom role.
- Select or clear Notify users through email, and click Apply.
Manage custom roles
The Account Administrator and Organization Administrators can view, edit, and delete custom roles from the Organization Settings page.
- Click the Organization Settings icon at the top right of your account.
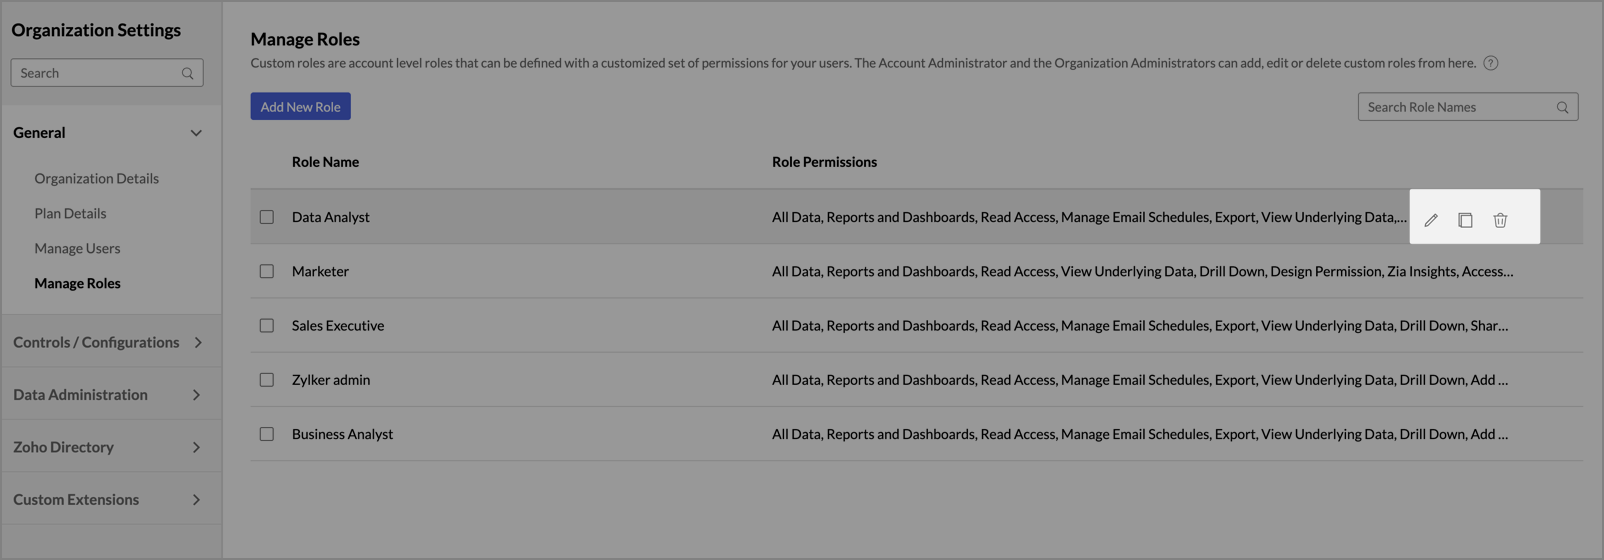
- In the left panel, click Manage Roles under General. All custom roles are listed with their permissions. Use the Search Role Names field to find a role quickly.
Hovering over a role shows the Edit, Duplicate, and Delete icons.
Edit a custom role
- Click the Edit icon that appears. The Edit Role dialog opens.
- Modify the settings as needed and click OK.
Duplicate a custom role
- Click the Duplicate icon that appears. The Duplicate Role dialog opens, with the role name suffixed with -Copy.
- Modify the name if needed and click OK. A copy of the role is created with the same permissions.
Delete a custom role
- Select the role or roles you want to delete. The Delete Roles link appears at the top of the list.
- Click the Delete Roles link. A confirmation alert appears.
- Click Yes to delete the roles.
You can also delete a single role using the Delete icon that appears when you hover over it.
Note: When you delete a custom role, the users assigned to it are changed to the User role. Ownership of the views they created, and of the sharing they set up, is transferred to the workspace administrator. The views must be shared again to be accessed in the workspace.
Frequently asked questions
1. Who can create custom roles?
The Account Administrator and Organization Administrators can create, edit, and delete custom roles from the Manage Roles page under Organization Settings.
2. How many custom roles can I create?
You can create any number of custom roles in your organization. You can also assign multiple roles to a user. Licensing is calculated by the number of users, not by the number of roles assigned to them.
3. How many users can I assign to a custom role?
You can assign a custom role to any number of users. Licensing is calculated by the number of users in your organization, not by the roles assigned to them.
4. Can users with a custom role share views?
Yes. Users with a custom role can share the views they have access to if the role includes the Share Views / Child Reports permission under Sharing & Collaboration Permissions.
5. What happens to custom roles if I downgrade my plan?
All users with a custom role are changed to the User role. Their custom roles are restored when you upgrade again.