Importing Data from Files
Zoho Analytics lets you import data from files stored on your computer, on an FTP server, or pasted directly into the import wizard. This page covers file-based imports and the settings that apply to them.
For data stored in cloud drives, web URLs, business applications, or databases, see Related Import Methods.
Note: Only Account Administrators, Organization Administrators, Workspace Administrators, and users assigned a custom role with the Import permission can import data from files.
Watch the below video to get a quick overview of importing data from files into Zoho Analytics.
What's in this page:
- Supported File Formats
- Starting an Import
- Importing Specific File Formats
- Configuring Import Settings
- Importing into an Existing Table
- Re-fetching and Scheduling Imports
- Handling Large Files
- Understanding Import Warnings and Errors
- Related Import Methods
- FAQ
Supported File Formats
Zoho Analytics supports import from the following file formats. Each format has its own configuration options. For format-specific settings, follow the link in the right column.
| Format | File extensions | Maximum size | Format guide |
| CSV | .csv, .tsv | 100 MB / 1 million rows | Importing CSV files |
| Excel | .xls, .xlsx | 100 MB / 1 million rows | Importing Excel files |
| HTML | .html, .htm | 100 MB / 1 million rows | Importing HTML files |
| JSON | .json | 100 MB / 1 million rows | Importing JSON files |
| XML | .xml | 100 MB / 1 million rows | Importing XML files |
| Statistical | .sav, .sas7bdat, .por, .dta | 100 MB / 1 million rows | Importing Statistical files |
| Spatial | .shp, .kml, .geojson | 100 MB / 1 million rows | Importing Spatial files |
| MS Access database | .mdb, .accdb | 100 MB / 1 million rows | Importing MS Access files |
| 100 MB / 1000 pages | Importing PDF files |
For files larger than 100 MB, use Zoho Databridge.
Starting an Import
You can start an import from one of three file sources: a local drive, pasted data, or an FTP server. The entry steps differ by source; the wizard settings that follow are the same regardless of source and are covered in Configuring Import Settings.
To begin an import:
- On the Zoho Analytics home page, click Import Your Data. Alternatively, in an existing workspace, click Create > New Table / Import Data.
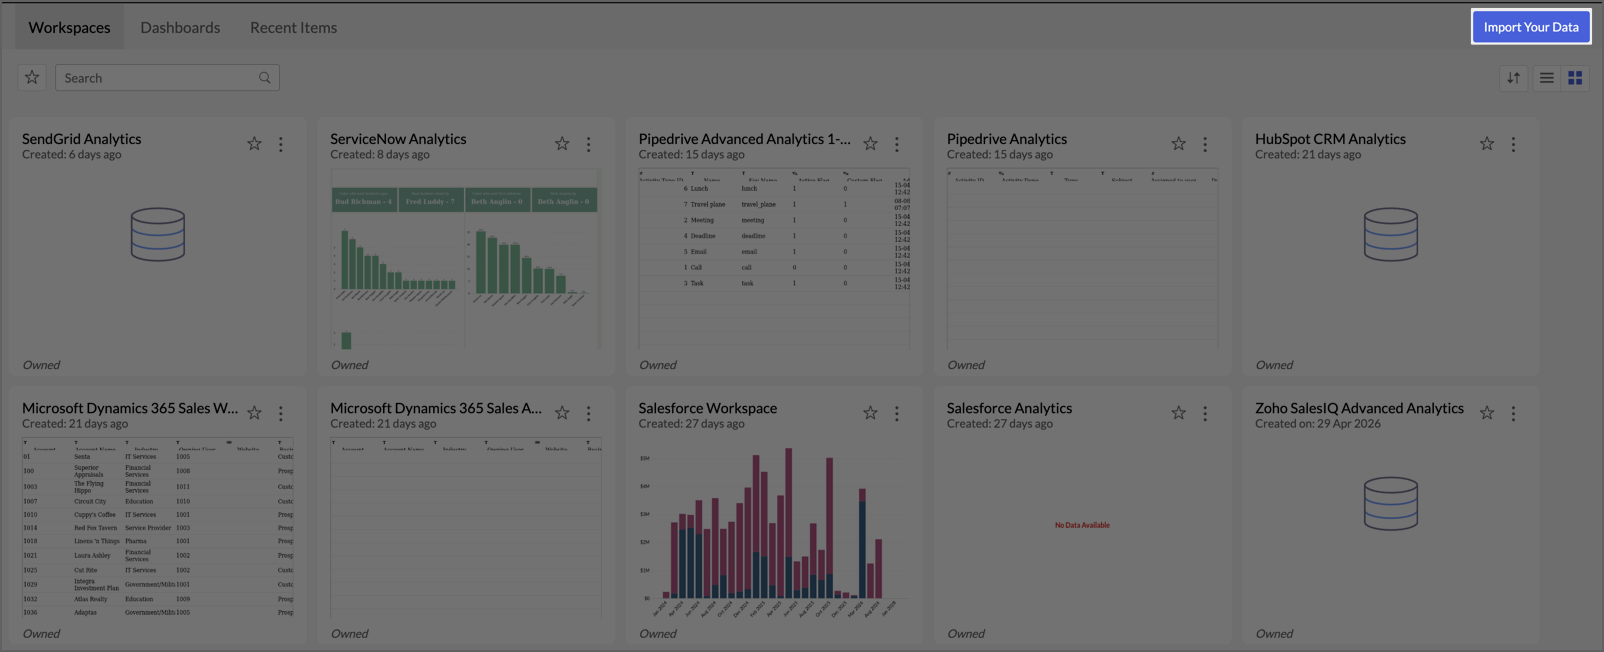
- In the Import Your Data screen, select Files & Feeds from the left category panel.
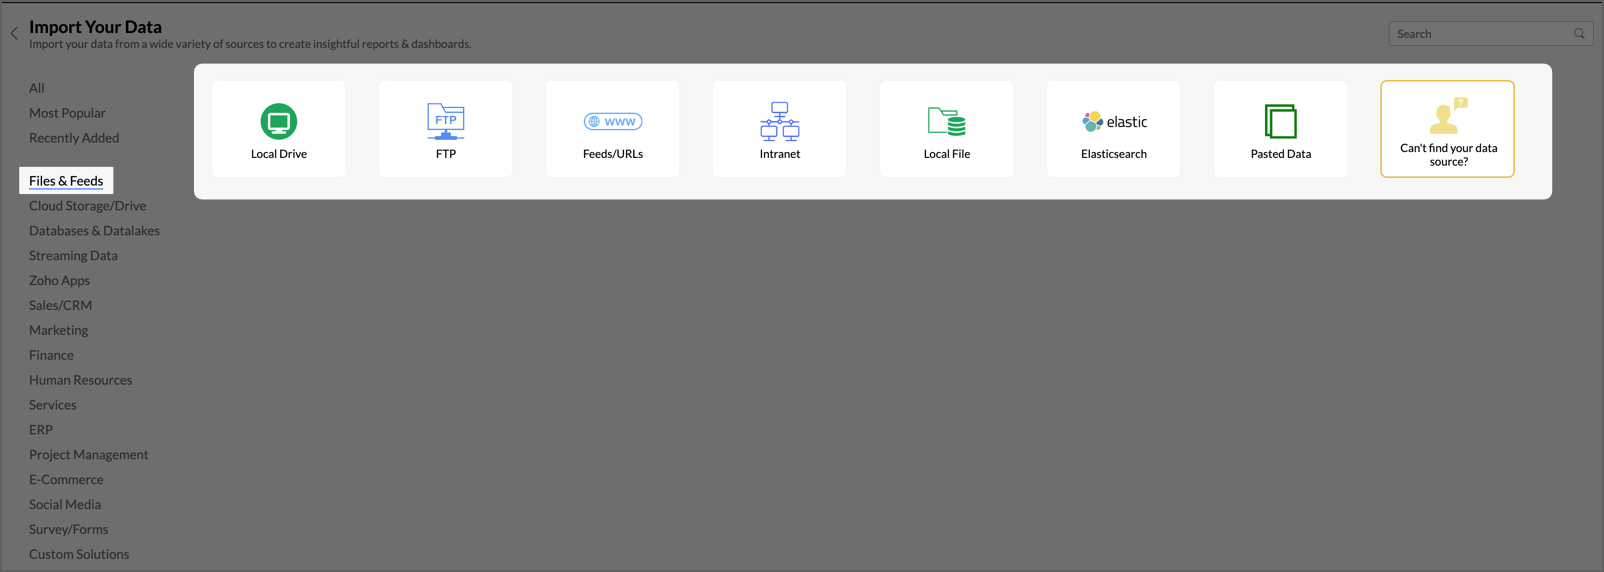
- Select one of the source tiles described below.


From a Local Drive
Use Local Drive to upload a file directly from your computer through the browser.
- Click the Local Drive tile. The Import wizard opens.
- Enter the Workspace Name and Workspace Description (optional). If you are importing into an existing workspace, enter the Table Name instead.
- From the File Type dropdown, select the format of the file you want to import.
- Click Choose File and select the file from your computer.
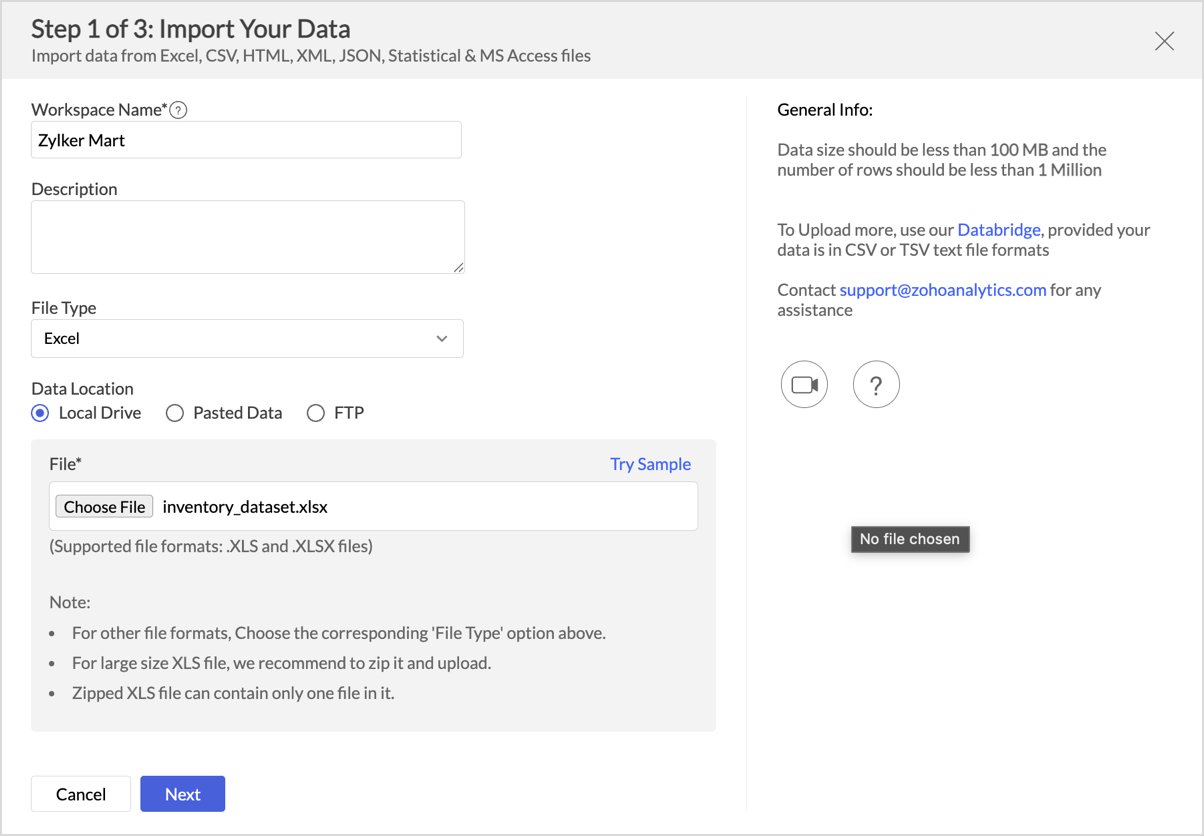
- Click Next to proceed to the wizard settings. See Configuring Import Settings.

By Pasting Data
Use Pasted Data when you have a small amount of tabular data on the clipboard, such as a section of a spreadsheet or text from a webpage.
- Click the Pasted Data tile. The Import wizard opens.
- Enter the Workspace Name and Workspace Description (optional).
- From the File Type dropdown, select the format of the pasted content.
- Paste your data into the text area.
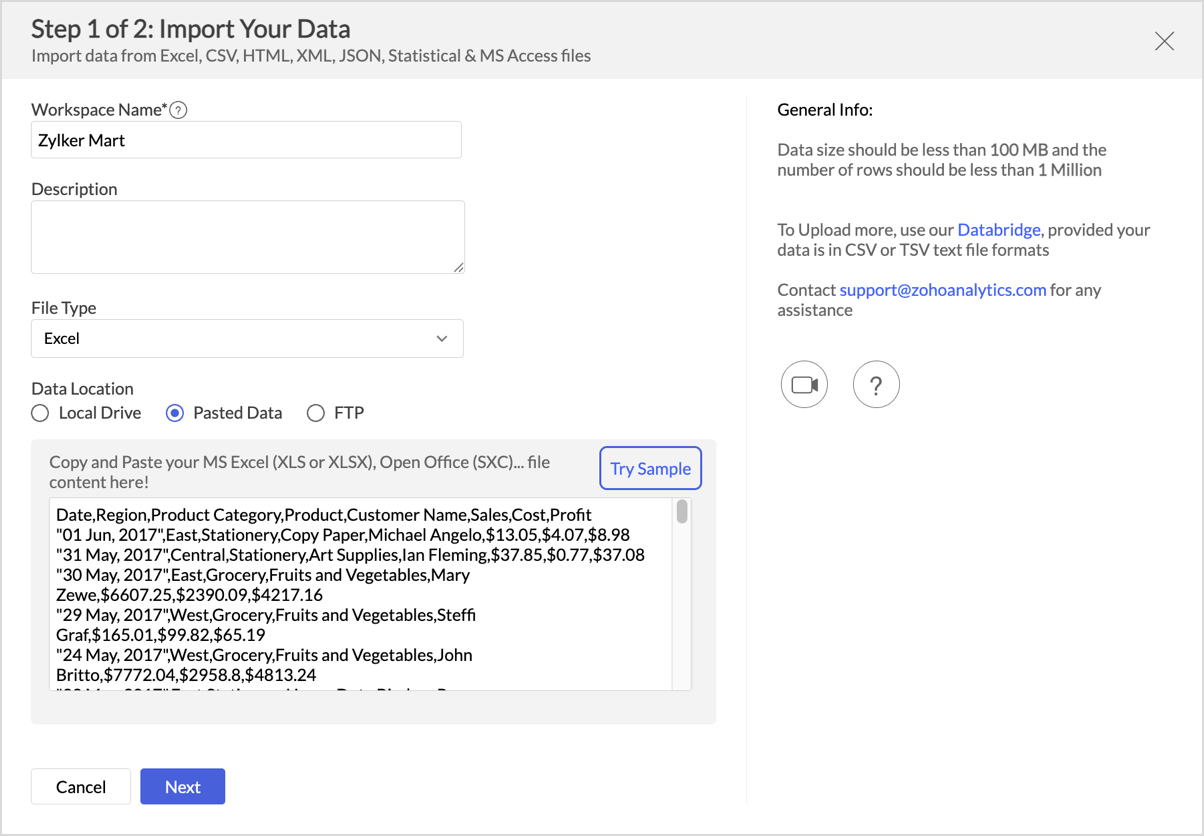
- Click Next to proceed to the wizard settings. See Configuring Import Settings.

Note: For HTML content, the pasted text must not contain <script> or <style> tags.
From an FTP Server
Use FTP to import data from a file hosted on an FTP server. This source supports scheduled refreshes.
- Click the FTP tile. The Import wizard opens.Select a Server Type:
- Enter the Workspace Name and Workspace Description (optional).
- From the File Type dropdown, select the format of the file you want to import.
- Enter the File Path of the file on the server.
- Select a Server Type:
- FTP - File Transfer Protocol on a plain server
- FTPS - Implicit - FTP over a secured server, encryption optional
- FTPS - Explicit - FTP over a secured server, encryption mandatory
- SFTP - SSH File Transfer Protocol, both commands and data are encrypted
- Enter the server details:
- FTP Server Host name - the host name of your server
- Port - the port number (default is 21)
- User Name and Password - credentials to access the server
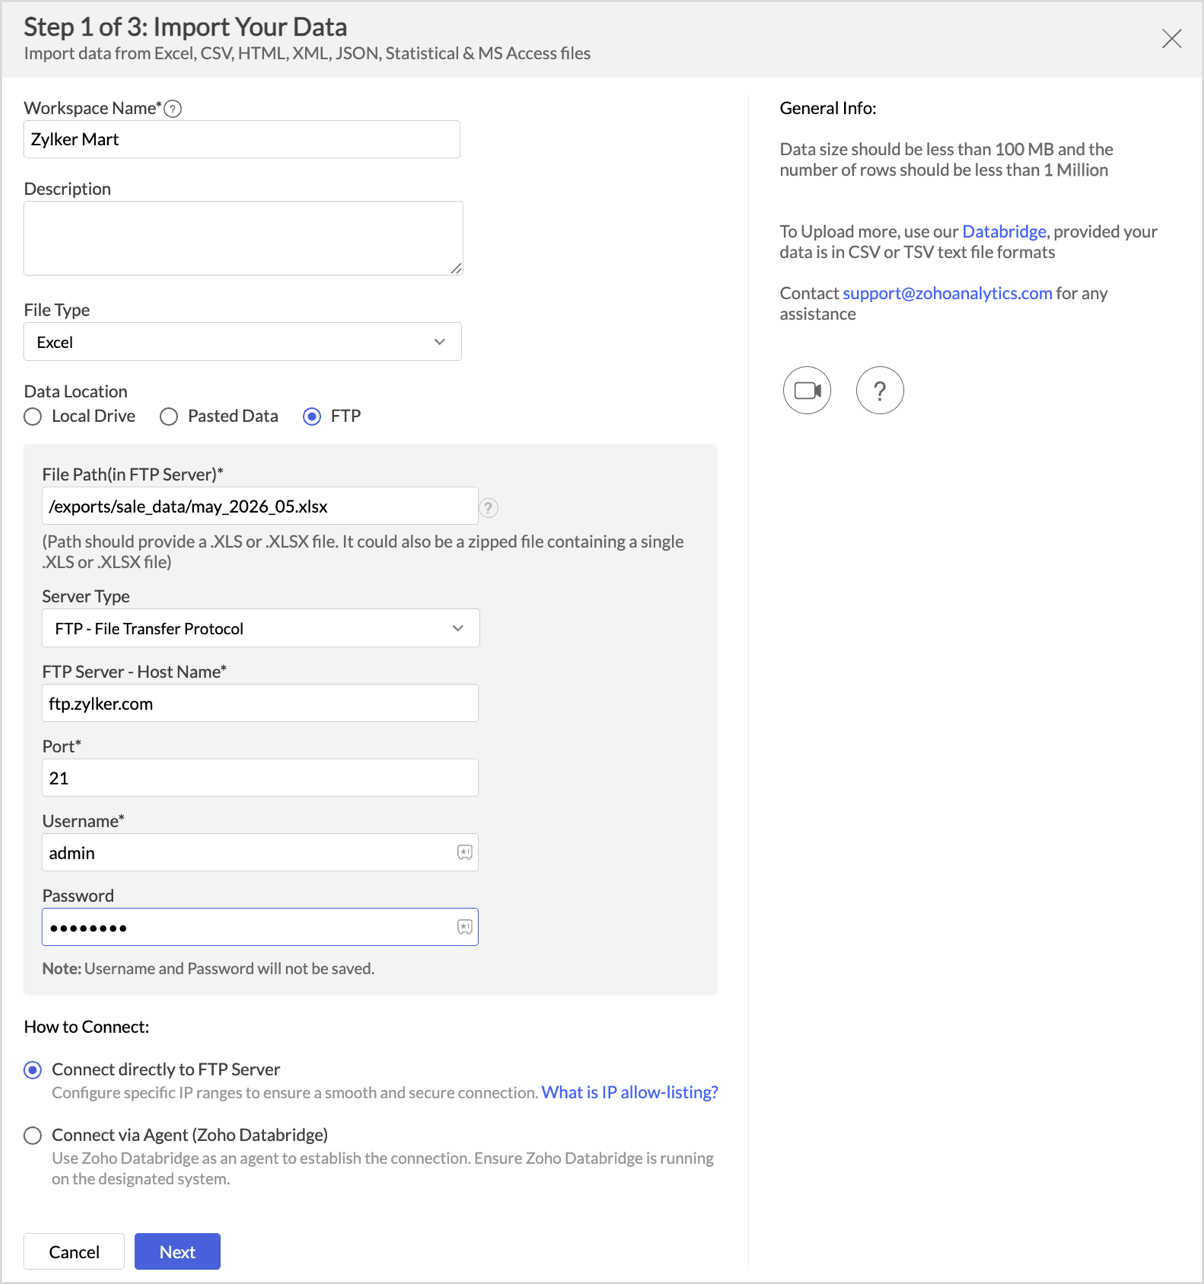
- Click Next to proceed to the wizard settings. See Configuring Import Settings.

Note: User name and password are stored only if you choose to schedule the import. Otherwise they are discarded after the initial fetch.
Importing Specific File Formats
After selecting a source and clicking Next, the wizard presents format-specific options based on the file you are importing. The following pages cover each format in detail:
- Importing CSV files - delimiters, text qualifiers, encoding
- Importing Excel files - sheet selection, named ranges
- Importing HTML files - tables on a web page
- Importing JSON files - structure and path
- Importing XML files - element mapping
- Importing Statistical files - SPSS, SAS, Stata
- Importing Spatial files - geometry data
- Importing MS Access files - table selection
- Importing PDF files - extract tables from PDF documents.
Configuring Import Settings
After selecting a source and a file, the wizard opens the settings page. The following settings apply to all file formats.
Table name and description
In Table Name, enter the name of the Zoho Analytics table that will hold the imported data. Add an optional description to help collaborators understand the table's purpose.
First row contains column names
If the first row of your data contains the column names, select Yes. Zoho Analytics uses those names as the column headers in the new table.
If you select No, the columns are named Column1, Column2, and so on. You can rename them after the table is created.
Note: Set this option to Yes whenever the file has headers. Imports that go on to be scheduled or used in Import from Email Attachment require column headers.
Format of date columns
If the imported data contains a date column, Zoho Analytics tries to detect the date format and shows it in the Format of Date column(s) field. If the detected format is wrong, select the correct format from the dropdown.
For details on date format strings, see Custom Date Format.
More Settings
The More Settings section contains additional import options that apply to the data as a whole. Click More Settings to expand the section.
The available options depend on the file format you selected. The options listed below apply to most file formats. Additional format-specific options (for example, delimiters for CSV files) are documented on the relevant format-specific page.
- Thousand Separator - the character used in the source data to separate thousands in numeric values. Select NONE if your data does not use a thousand separator.
- Decimal Separator - the character used in the source data to separate the integer and fractional parts of a numeric value. The default is Dot ( . ).
- Skip top rows - the number of rows at the top of the source data to ignore during import. Use this when your file has metadata, blank rows, or a logo above the actual data table. The default is 0. Note that empty rows and commented rows are skipped automatically, regardless of this setting.
Preview and column operations
The Preview table shows the top few rows of your data. Verify each column name and data type before continuing. In the Preview, you can:
- Rename a column - double-click the column header
- Change a column's data type - select a new type from the dropdown below the column name
- Exclude a column - clear the checkbox next to the column header
Note: Set the right column type before importing. Mismatched types can cause errors during the import.
On Import Errors
Use On Import Error to control how Zoho Analytics handles rows that fail to import:
- Set Empty Value for the Column (default) - imports the row with an empty value for the problematic column
- Skip Corresponding Rows - skips any row that contains an error
- Don't Import the data - cancels the import if any error occurs
Once all settings are configured, click Create to begin the import. The Imported Data Summary dialog opens when the import completes. See Understanding Import Warnings and Errors.
Importing into an Existing Table
You can import new data into an existing table to keep it up to date, instead of creating a new table each time.
To import into an existing table:
- Open the workspace and select the table you want to update.
- Click Import Data > Import Data into this table.
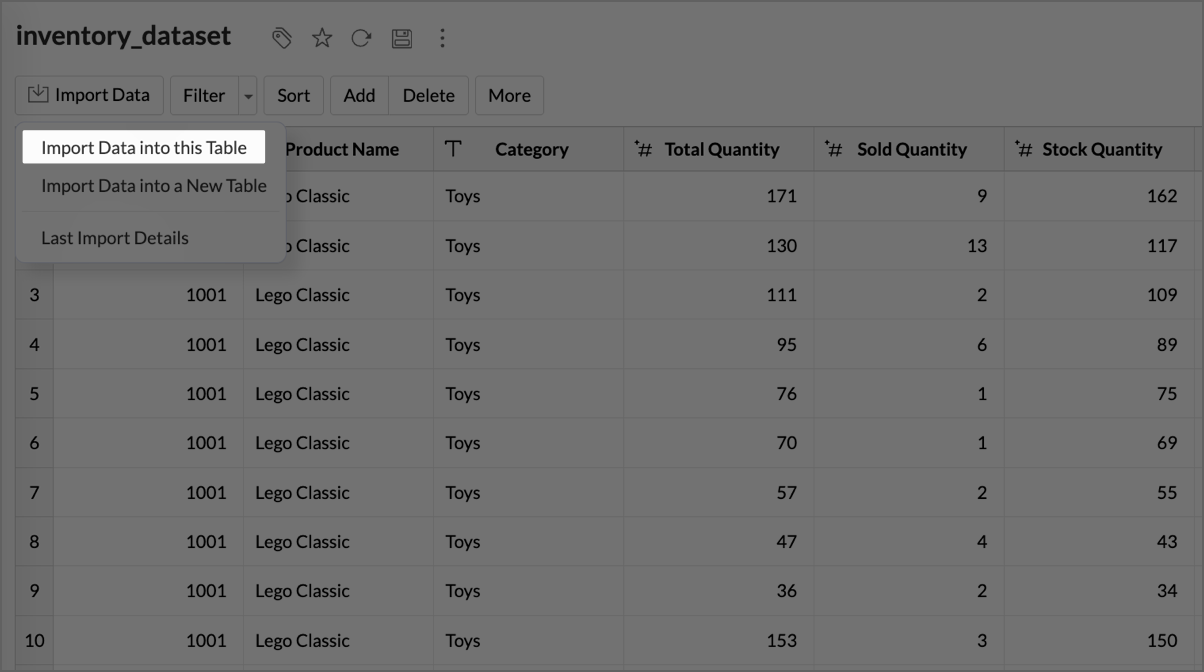
- Select your data source (Local Drive, FTP, or another supported source) and select the file.
- In the How do you want to import? section, choose one of the following modes:
- Add records at the end - appends the new records to the end of the existing table
- Delete existing records and add - deletes all existing records and replaces them with the new ones
- Add records and replace if already exists - updates existing records that match the new data and appends new records to the end
- Add records, replace existing and delete missing records - updates existing records, appends new ones, and removes records present in the table but absent from the new file
- Configure error handling and other settings, then click Save.

Import Via Email Attachment
The Import from Email Attachment option lets users update a table by emailing the data as a file attachment. This is useful when team members in different locations need to contribute data to a shared report.
Note: Import from Email Attachment is available only in the Premium and Enterprise plans.
Prerequisites
Before you can enable Import from Email Attachment for a table, you must:
- Create a workspace and import an initial table that defines the column structure. The table can contain just the column names if you do not have data yet.
- The initial import must come from a file source: Local Drive, Web, or FTP. The Import from Email Attachment option is enabled only after this initial import.
Set up Import from Email Attachment
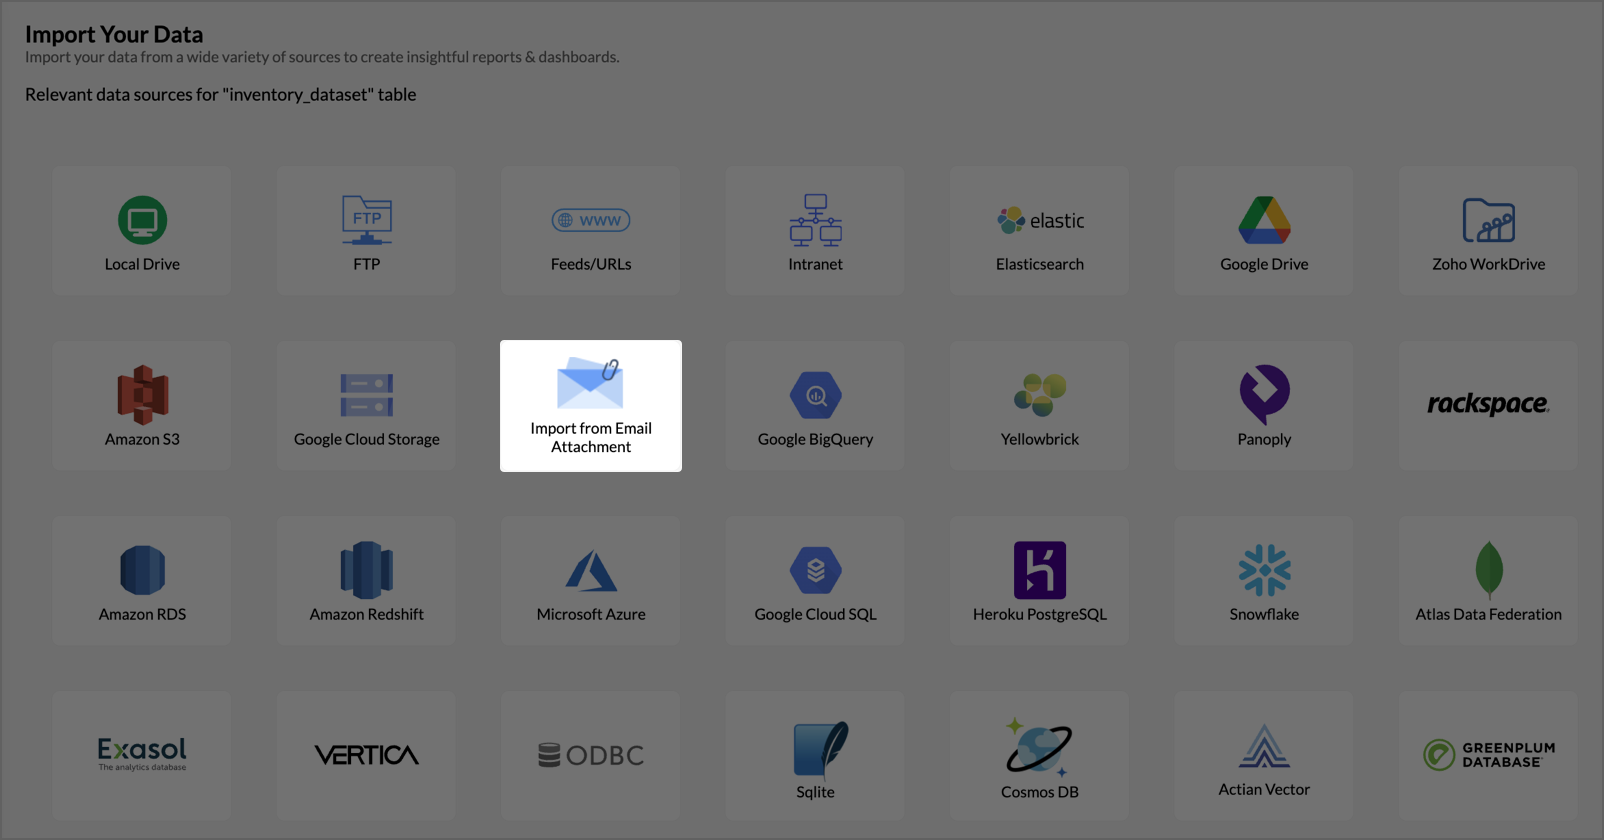
- Open the table you want to receive email-attached data.
- Click Import Data > Import Data into this table.
- In the Import Your Data section, select Import from Email Attachment.
- In the Import from Email Attachment dialog, note the email address shown next to Forward your email to. Users will send their data to this address.
- In the Who can send email field, enter the email addresses of users who are authorized to send data, one per row.
- Select an import mode from the How do you want to Import? section. The four modes are the same as in Importing into an Existing Table.
- If you selected Add records and replace if already exists or Add records, replace existing and delete missing records, specify the matching columns.
- Configure error handling and the header-row option.
- In the Add new columns section, select Yes to automatically add new columns if subsequent attachments contain additional columns. Select No to reject any new columns and import only the existing ones.
- In the Notify on failure section, select Yes to receive a failure notification (sent to both the administrator and the sender) when an import fails.
- Click Save.


Note: Attachments must meet the following requirements:
- Send the data as a file attachment, not as inline content.
- The file format must match the format used in the initial import. For example, if the initial import was a CSV file, only CSV attachments are accepted.
- Send only one attachment per email. Emails with multiple attachments are discarded.
Note: After a user sends an email, the data takes time to appear in the table because it is queued for processing. Allow 20-30 minutes for the data to update.
Manage Email Attachment imports
After setup, you can view, edit, or disable the Email Attachment configuration from the table.

- View the last import - click Import Data > Last Import Details to see the details of the most recent attachment import.
- Edit the setup - click Import Data > Edit Import from Email to change authorized senders, import modes, matching columns, or other settings. If you remove a sender from the list, future emails from that address are no longer processed.
- Disable the setup - in the Edit Import from Email dialog, click Disable settings, then confirm. Disabling deletes the configuration. Any emails sent after disabling are not processed.
Re-fetching and Scheduling Imports
Zoho Analytics can refresh imported data automatically on a schedule or on demand. Scheduling is available only for imports from a Web URL or an FTP server. The source data must have column headers.
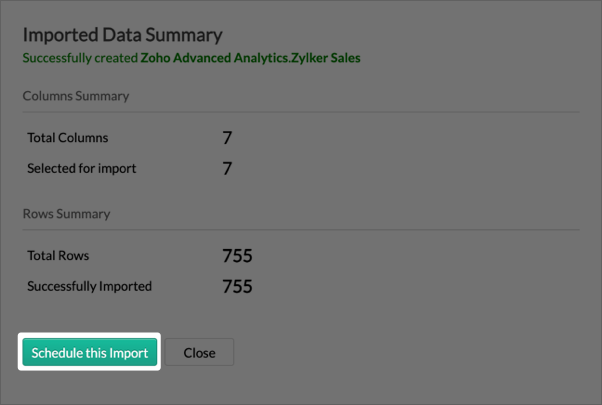
To schedule an import:
- After completing an import from FTP, click Schedule This Import in the Imported Data Summary dialog.
- Set the schedule frequency. The maximum refresh rate depends on your plan:
- Basic - 1 refresh per day
- Standard - 8 refreshes per day
- Premium - 8 refreshes per day
- Enterprise - 24 refreshes per day
- Click Save.

Note: Imports from Local Drive and Pasted Data sources cannot be scheduled because Zoho Analytics has no persistent connection to the source after the initial import.
Handling Large Files
The maximum file size for direct upload is 100 MB, and the maximum row count is 1 million rows per import.
For larger files, use Zoho Databridge. Databridge is a desktop agent that fetches data from your local files and uploads it to Zoho Analytics in chunks, bypassing the browser upload limit.
For more information, see Zoho Databridge.
Understanding Import Warnings and Errors
When an import completes, the Imported Data Summary dialog shows the outcome. The summary includes:
- Column Details - the total number of columns in the source data and the number selected for import.
- Row Details - the total number of rows in the source data and the number imported successfully.
- Error and Warning Details - any errors or warnings generated during the import. Common warnings include data type mismatches, malformed dates, and rows that exceeded the column count.
For row-level errors, the behavior depends on the On Import Error option you selected. See Configuring Import Settings.
Related Import Methods
The following pages cover imports from sources other than files:
- From Feeds and URLs - import from authenticated and unauthenticated web URLs
- From Intranet Files - import from URLs on a private network
- From Cloud Storage - import from Google Drive, OneDrive, Dropbox, Amazon S3, and other cloud drives
- From Business Apps - import from Salesforce, HubSpot, Zoho CRM, and 50+ other business applications
- From Databases - connect to local and cloud databases including MySQL, PostgreSQL, SQL Server, and Snowflake
FAQ
1. Why is my date column being imported as text?
Zoho Analytics tries to detect the date format from the first few rows of your data. If the format does not match a standard pattern (for example, the data uses a regional format such as DD-MM-YYYY), the column is imported as text. In the Preview step, set the Format of Date column(s) to the format that matches your data.
2. Why are some rows missing after import?
Rows can be skipped for the following reasons:
- You selected Skip Corresponding Rows in the On Import Error option, and those rows contained errors such as data type mismatches or malformed dates.
- The source data contained empty rows that were treated as separators.
- The import exceeded the 1 million row limit for a single import.
Check the Imported Data Summary dialog for the row count and any reported warnings to understand which rows were affected and why.
3. Can I update an existing table with a new file instead of creating a new table?
Yes. Use Import Data > Import Data into this table on the existing table. You can choose to append new records, replace all records, or update records based on matching columns. See Importing into an Existing Table.
4. Can I import files larger than 100 MB?
Yes, use Zoho Databridge. Databridge is a desktop agent that uploads large files in chunks. See Handling Large Files.
5. How do I get updated data into Zoho Analytics when my source file changes?
The method depends on where your source file is hosted:
- FTP server or Web URL: Configure a scheduled refresh during the initial import by clicking Schedule This Import in the Imported Data Summary dialog. Zoho Analytics will automatically fetch the latest version of the file based on the schedule you set.
- Local Drive or Pasted Data: There is no automatic refresh because Zoho Analytics has no persistent connection to the source. To bring in the updated data, open the table, click Import Data > Import Data into this table, and select the updated file.
- Large or frequently changing local files: Use Zoho Databridge, which can push file changes to Zoho Analytics automatically.
6. Can I import multiple files in one go?
Each import creates one table from one file. To import multiple files, repeat the import for each file. If the files have the same structure, you can combine them into one table using Importing into an Existing Table with the Add records at the end mode.
7. Why are some warnings appearing in the Import Summary?
Warnings are non-fatal issues that the import handled automatically based on your On Import Error setting. Common warnings include data type mismatches and malformed dates. Review the warnings to confirm the data was handled the way you expected.
8. Can I schedule imports from a local file?
No. Scheduled imports require a persistent source connection, which is available only for Web URLs and FTP servers. For local files that change frequently, use Zoho Databridge, which can be configured to push file changes to Zoho Analytics automatically.
9. What happens to my reports if I re-import a table?
If you re-import data into the same table using one of the modes described in Importing into an Existing Table, the structure of the table is preserved and your reports continue to work. If you delete the table and import a new one, your reports will break and need to be rebuilt.
10. Can someone else send data to my workspace using email attachment?
Yes, if you set up Import from Email Attachment on a table and add their email address to the Who can send email list. Only addresses on that list can send data to the table.